0. Overview
This project aims to port Linux OS to the HP Prime calculator. It is based on the Buildroot distribution. Long term goal is providing an alternative OS on Prime that is more capable than the original OS (PPL support, or better RPN support, native binary code execution for sure, and so on).
Please be aware this project is still in its early stages. It is not useful for general use as a calculator OS yet.
WARNING: THE SOFTWARE IS PROVIDED "AS IS", WITHOUT WARRANTY OF ANY KIND, EXPRESS OR IMPLIED, INCLUDING BUT NOT LIMITED TO THE WARRANTIES OF MERCHANTABILITY, FITNESS FOR A PARTICULAR PURPOSE AND NON-INFRINGEMENT. IN NO EVENT SHALL THE AUTHORS OR COPYRIGHT HOLDERS BE LIABLE FOR ANY CLAIM, DAMAGES OR OTHER LIABILITY, WHETHER IN AN ACTION OF CONTRACT, TORT OR OTHERWISE, ARISING FROM, OUT OF OR IN CONNECTION WITH THE SOFTWARE OR THE USE OR OTHER DEALINGS IN THE SOFTWARE.
WARNING: The software is not fully tested. Installing it might brick your calculator (unable to boot) or you may lose the ability to install the original (stock) HP Prime OS back. Use it at your own risk.
WARNING: None of the software/ documentation/ guide provided shall be used for cheating in the exam. Linux OS shall not be used when using the calculator in the exam or any other cases that doing so would cause academic integrity violations.
If you have any questions, feel free to contact me (zephray at outlook dot com). All scripts are released to public domain (if applicable).
1. Status
Linux OS:
- [x] DDR initialization
- [x] U-boot Boot loader
- [x] Basic Linux OS
- [x] LCD controller SPI driver
- [x] LCD fbdev driver
- [x] PWM backlight driver
- [x] Touchscreen driver
- [x] PMIC driver
- [x] keypad driver
- [x] NAND flash driver
- [ ] Standby
Application:
- [ ] Launcher UI
- [ ] System settings UI
More applications T.B.D.
2. Install
Installing the Linux OS to NAND Flash or running the Linux OS in the RAM requires you to open up the back case of the calculator, which by definition, void your warranty.
You will need:
- A HP Prime G2 calculator (2AP18AA)
- An USB cable (USB A to Micro B) to connect Prime with PC
- A screwdriver
- Tweezers (conductive, or jump wire)
- A PC running either Linux or Windows 7+
- HP-Prime-Linux release package from https://github.com/zephray/hp-prime-linux/releases
2.1 Entering the SDP mode
NOTE: If you already have Linux installed, you may just use flash_erase /dev/mtd0 0 0 to erase the boot sector, so after reset it would fail to boot and fallback to the SDP mode.
Open up the calculator case, connect the USB cable to PC and turn on the calculator.
WARNING: Please be careful. Shorting the wrong pins may cause irreversible damage to your calculator's hardware.
While the calculator is ON, use tweezers to short these two solder pads and press the RESET button (push button on the back of the keypad). You should see a new USB device called "SE Blank 6ULL" on your PC. (Linux users may use lsusb to check if there is a new Freescale USB device connected).
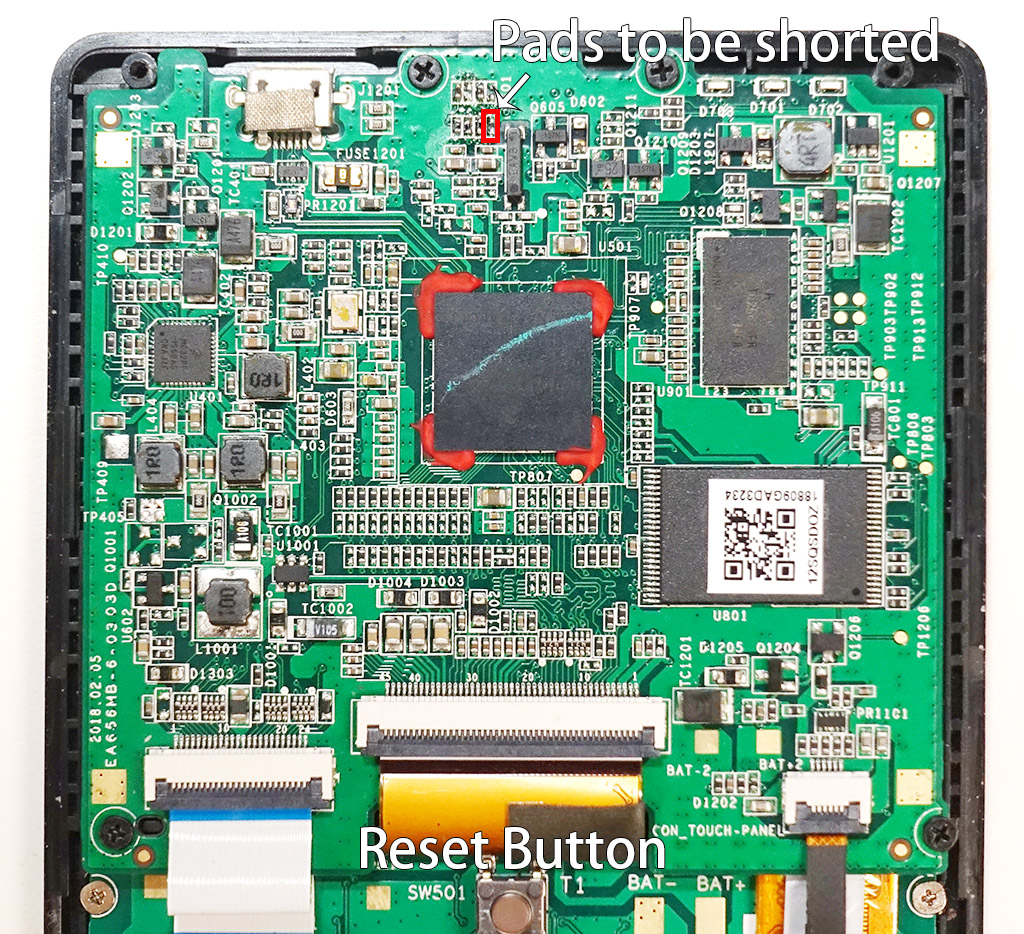
NOTE: The pin you are shorting is the Boot Mode 1 and ground . By default it is pulled up to 3.3V by a 10K pull up resistor.
Now you may follow either of the following options. It is possible to do multiple things consecutively without rebooting your calculator. For example, you may first backup the NAND flash and then flash the Linux OS without rebooting the calculator.
2.2 Backup the NAND
WARNING: The NAND backup does not utilize any ECC, instead, it will backup the OOB (out-of-band) data as well. It would also backup all bad blocks. In this way, it does not depend on any specific bad block management or ECC schemes. This means, you may not be able to restore the backup if the nand flash is worn (more bad blocks, more bit errors, etc) over time. You may also only use your own backup. Backup made on other calculators may not work on your calculator. To be short, just don't rely on this too much, I have no idea how reliable it is.
To do so, first put calculator into SDP mode. Open up a command prompt. Change to flash_utility folder.
For Windows users, run
uuu backup_nand.uu
For Linux users, run
sudo ./uuu backup_nand.uu
Once it is done, you should see the whole NAND backup in the backup folder.
2.3 Restore the NAND
You should have the whole NAND backup in the backup folder before proceeding.
To do so, first put calculator into SDP mode. Open up a command prompt. Change to flash_utility folder.
For Windows users, run
uuu restore_nand.uu
For Linux users, run
sudo ./uuu restore_nand.uu
2.4 Run Linux in the RAM
It is possible to run the Linux OS without overwritting the NAND flash. However, you would need to enter SDP mode and use USB to sideload everything every time you want to use Linux.
WARNING: This should not corrupt your original OS. However, doing so may still cause irreversible damage to your hardware due to possible bugs in the code.
NOTE: When running in the RAM, the root filesystem image size should not exceed ~15MB, otherwise it won't boot.
To do so, first put calculator into SDP mode. Open up a command prompt. Change to flash_utility folder.
For Windows users, run
uuu run_linux_in_ram.uu
For Linux users, run
sudo ./uuu run_linux_in_ram.uu
Now the calculator should boot into Linux. Use root to login.
2.5 Flash Linux in to the NAND
WARNING: Make sure you have a full NAND backup before proceeding. However, there is no gaurantee that you can always restore the NAND backup for the reason stated before in the backup section.
WARNING: Doing so may still cause irreversible damage to your hardware due to possible bugs in the code.
To do so, first put calculator into SDP mode. Open up a command prompt. Change to flash_utility folder.
For Windows users, run
uuu flash_linux_to_nand.uu
For Linux users, run
sudo ./uuu flash_linux_to_nand.uu
It would take several minutes to complete. Once done, reset the calculator, it should boot into Linux. It would take ~15 seconds to boot into system. Use root to login.
3. Use
Currently there isn't much to play with.
3.1 USB Serial Console
You can use a USB cable to connect the calculator to PC and access the Linux console from your PC. It should show up as a USB serial device. Use Tera Term, PuTTY, SecureCRT, minicom, or other similar tools to connect to the board. Because it is not acutall serial port, baud rate doesn't matter. You may use any baud rate you want.
4. Compile from source
The following are tested under Ubuntu 18.04 LTS. It is recommended to compile under Linux host.
4.1 u-boot
Normally you don't need to recompile the u-boot. The following instructions are provided as reference.
To compile the u-boot from source:
git clone git://github.com/zephray/uboot.git
cd uboot
git checkout imx_v2018.03_4.14.98_2.0.0_ga
make mx6ull_prime_defconfig
ARCH=arm CROSS_COMPILE=arm-linux-gnueabihf- make
u-boot-dtb.imx is the compiled binary.
4.2 Kernel
If you want to enable or disable certain driver/ kernel moudles, you would need to recompile the kernel.
4.2.1 Compile kernel with Buildroot
The buildroot would compile the kernel automatically. To change config, use make linux-menuconfig
4.2.2 Compile kernel manually
git clone git://github.com/zephray/linux.git
cd linux
git checkout imx_4.14.98_2.0.0_ga
ARCH=arm CROSS_COMPILE=arm-linux-gnueabihf- make hp_prime_defconfig
ARCH=arm CROSS_COMPILE=arm-linux-gnueabihf- make
arch/arm/boot/dts/imx6ull-14x14-prime.dts and arch/arm/boot/zImage are the compiled binaries.
4.3 Root Filesystem
Currently hp-prime-linux uses buildroot to construct the root filesystem. Currently there is no package manager, if you need to add or remove package, you would need to rebuild the rootfs.
git clone git://git.buildroot.net/buildroot
cd buildroot
git checkout 2019.02.4
make BR2_EXTERNAL=~/Prinux/buildroot prime_defconfig
make
To install kernel modules to your rootfs, go to kernel directory, run the following commands:
INSTALL_MOD_PATH=~/buildroot/output/target ARCH=arm CROSS_COMPILE=arm-linux-gnueabihf- make modules_install
And run the make in the buildroot again to regenerate images.
5. Configure the system
5.1 uboot
Normally the u-boot already contains all the necessary settings to boot from RAM or NAND. However, if needed, you may boot the OS manually using the following commands via serial console:
nand read ${loadaddr} 0x400000 0x800000
nand read ${fdt_addr} 0xc00000 0x100000
bootz ${loadaddr} - ${fdt_addr}
To change default boot commands, look into include/configs/mx6ull_prime.h.
5.2 kernel
5.2.1 Kernel configuration
Use make menuconfig to enable or disable modules.
5.2.2 Keypad mapping
Keypad mapping can be modified in arch/arm/boot/dts/imx6ull-14x14-prime.dts. However, for future software compatibility concerns, it is not recommended to modify it.
5.3 OS
5.3.1 Enable VT console
In the release, this is enabled by default.
vi ~/buildroot/output/target/etc/inittab
Type in the following:
tty0::respawn:/sbin/getty -L tty0 vt100 # VT
5.3.2 Enable the USB serial console
In the release, this is enabled by default. However, if you are building your own rootfs, you may want to enable this.
USB serial gadget need to be compiled as a module and probed at runtime. Make sure your rootfs have that module. See the building rootfs section for details
Write the config so it would probe the module automatically during start up:
vi ~/buildroot/output/target/etc/init.d/S03modules
Type in the following:
#!/bin/sh

case "$1" in
    start)
        modprobe g_serial
        ;;
    *)
        exit 1
        ;;
esac
Enable console on the USB serial:
vi ~/buildroot/output/target/etc/inittab
Type in the following:
ttyGS0::respawn:/sbin/getty -L ttyGS0 115200 vt100 # USB SERIAL
5.3.3 Enable nodm
ln -s usr/lib/systemd/system/nodm.service etc/systemd/system/display-manager.service
rm etc/systemd/system/default.target
ln -s lib/systemd/system/graphical.target etc/systemd/system/default.target